Employee Module
The AttenDeep Employee Management module helps HR professionals easily manage employee records, including personal information, bank details, and job-related data.
Profile

This is the first view of the AttenDeep Employee section. In the image above, area marked as 1 is the main Employee module, and area 2 in the sidebar shows the employee's profile. A logged-in user can see all employee details here. The edit button at the top right, marked as 3, opens a form where you can update the employee’s personal and bank information. Clicking the three dots (marked as 4) will show a small table with all the available tabs for the employee view, along with checkboxes (marked as 5). Employees can choose which tabs should be visible in the profile view. If a checkbox is unchecked, that tab will be hidden from the view.
Let’s go through the tabs one by one. The first tab is 'About', which shows the employee’s personal, work, bank, and contract details, as shown in the image above.
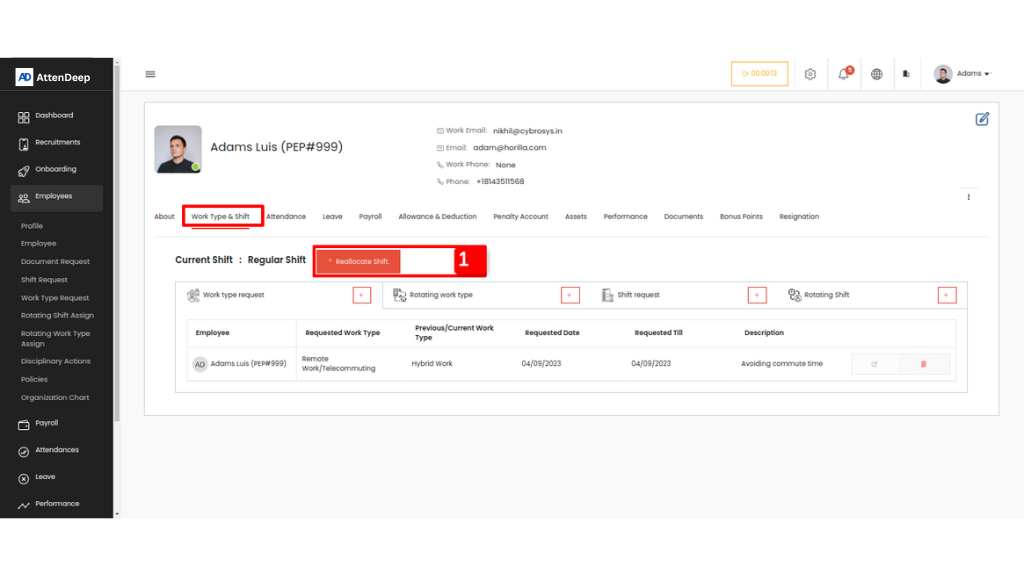
The next tab is 'Worktype & Shift'. In this section,
employees can see a table showing all their Work Type Requests, Rotating Work Types, Shift Requests, and Rotating
Shift Requests. From here, employees can submit any of these requests.
This view also includes a feature called 'Shift Reallocation'. There is a button labeled 'Reallocate Shift'
(marked as 1) for this purpose. If an employee needs to temporarily change their shift, they can request a shift
reallocation. The request must include the name of the employee who is taking over the shift, the new shift
details, the start and end date, and a description.
Once submitted, the request is sent to both the selected employee and the admin. The selected employee can respond
to confirm if they are available for the shift. The admin then approves or rejects the request. If approved, both
employees' shifts will automatically switch on the requested start date.
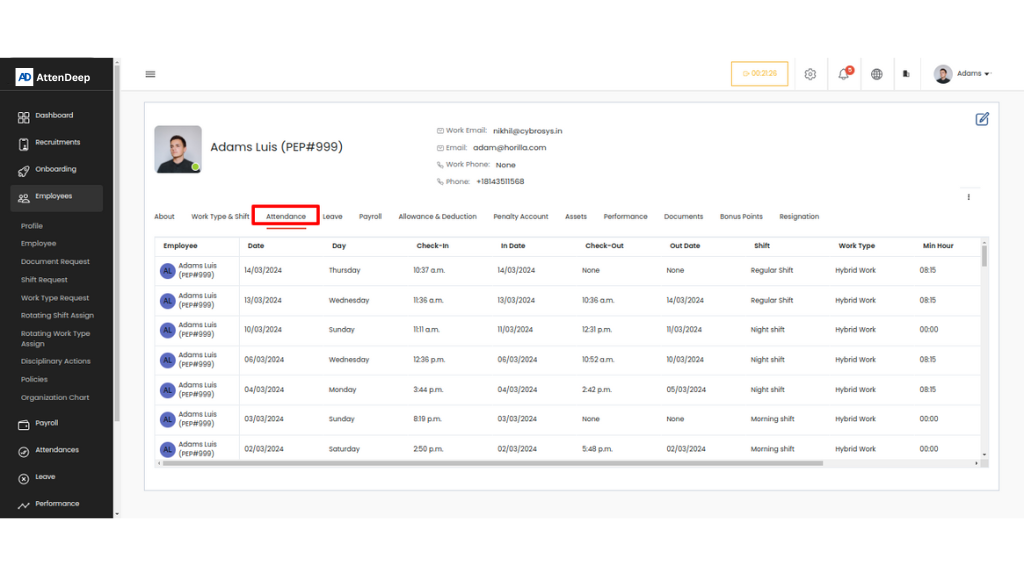
The next tab is 'Attendance', which displays all of the employee’s attendance records in a table. Clicking on any row will open a detailed view of that specific attendance entry.

The 'Leave' tab shows all leave request details and the available leave types for the employee. From this view, the employee can also submit a new leave request. At the top right, the tag marked as 1 shows the status of each request, which is also indicated by a color on the left side of each row. The section marked as 2 displays the available leave types. By clicking on any leave type, the employee can request leave under that category.

The 'Payroll' tab displays all payslips generated for the employee. Clicking on a row opens a detailed view of that specific payslip. The download button, marked as 1, allows the user to download the payslip in PDF format.

The next tab is 'Allowance & Deduction', which shows all the allowances and deductions assigned to the employee. If the user is an admin, they can add a new entry by clicking the '+' button marked as 1 in the table.

The 'Penalty Account' tab shows any penalties assigned to the employee. If the employee takes extra leaves or has LOP (Loss of Pay) days, the admin can add a penalty as either a specific amount or in the form of leave days. When a payslip is generated during the penalty period, the penalty amount will be automatically deducted.

The 'Asset' tab shows detailed information about the assets currently assigned to the employee. From this view, the employee can request a new asset by clicking the button marked as 1. In the detailed view, accessed by clicking a row, there is also an option to return the asset.

The 'Performance' tab displays all feedback related to the employee. If a feedback has already been answered, the employee can view the response by clicking the eye icon. If it hasn’t been answered yet, the employee can submit a response by clicking the icon next to the eye button, marked as 1.

The 'Documents' tab is used to store employee documents in their profile. By clicking the 'Create' button marked as 1, the user can upload their documents to this tab. If the admin requests any documents, the request will also appear here, and the user can upload the required file. The action buttons (marked as 2) — for approving, rejecting, or deleting uploaded files — are only visible to admins. Regular employees won’t see these buttons. More details about this will be explained in the Document Request section.

The 'Bonus Point' tab allows employees to redeem bonus points awarded by their manager or admin. In the admin view, the 'Add' button (marked as 1) is visible, allowing admins to give bonus points to employees from their profile. Employees can redeem points by clicking the 'Redeem Now' button (marked as 2) and entering the number of points they want to convert. The redeemed amount will appear in that month’s payslip. The value of each bonus point can be set under Settings > General Settings > Encashment Redeem Condition.
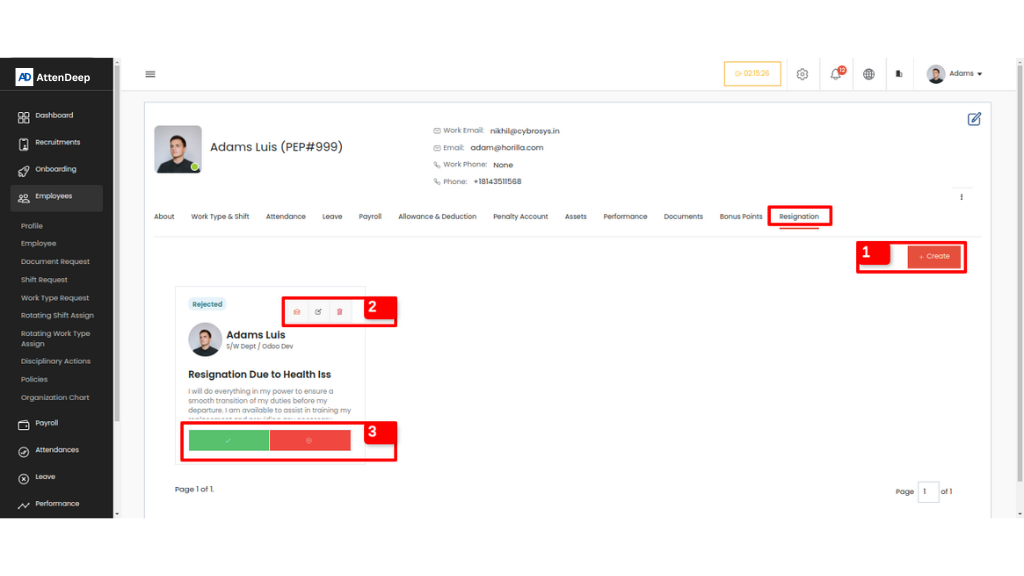
If an employee wants to resign, they can submit a resignation request by clicking the 'Create' button (marked as 1) in the 'Resignation' tab of their profile. Other options are only visible to admins. At the top of the card (marked as 2), admins can send an email, edit the request, or delete it. The 'Approve' and 'Reject' buttons (marked as 3) allow the admin to accept or decline the resignation. Once approved, the employee is moved to the Off-boarding section.
Employee

By clicking 'Employee' under the main 'Employees' tab
(marked as 1), you can access the Employee Directory or Database view. There are two layout options available:
Card view and List view. From here, you can see all employee details or add a new employee by clicking the
'Create' button on the right side of the page, next to the search bar (marked as 2). You’ll also find filter,
group by, and view options in this area.
The 'Action' menu includes several bulk actions like import, export, bulk archive, unarchive, update, and delete.
These actions can be applied to multiple selected employees. Quick filters (marked as 3) help you instantly filter
employees who are online or offline.
At the top of the table, there’s a 'Select All' checkbox, common across all list views in the system. Clicking it
selects all records at once, and the number of selected items will be shown next to it. You'll also see options to
export or unselect.
The three-dot menu (marked as 4) lets you choose which columns should be visible in the table.
Inside the table, there are four main actions for each employee:
- Send Mail – Admin can send an email directly by clicking the employee row.
- Update
- Archive / Unarchive
- Delete
Document Request

The 'Document Request' view is only accessible to
admins, reporting managers, and employees with the necessary permissions.
To open it, go to 'Employees' (marked as 1) → 'Document Request' (marked as 2). The image above shows this view.
Users can search and filter the document requests using the search and filter options. The 'Action' button
provides a dropdown for bulk approving or rejecting documents.
To create a new request, click the 'Create' button.
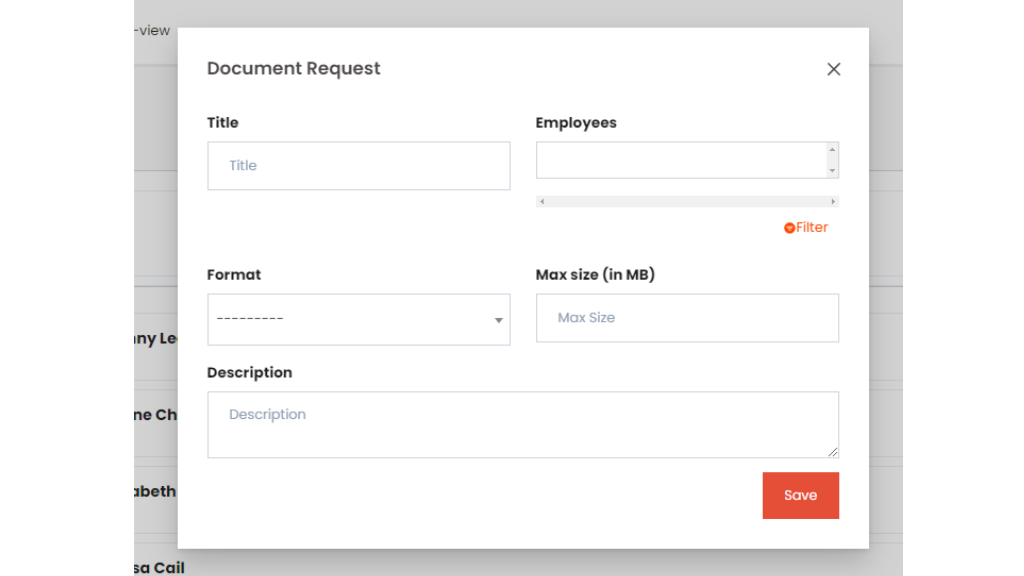
This is the form used to create a document request. The form includes the following fields:
- Title: The name of the document request.
- Employees: The employees who need to submit the document. You can select them using the filter widget by clicking the filter button next to the input field.
- Format: The required file format. Options include PDF, TXT, DOCX, XLSX, JPG, PNG, and JPEG. Employees must upload the document in one of these formats.
- Max Size: The maximum allowed file size (in megabytes).
- Description: Additional details about the document request.
Once a document request is created, the selected employees will receive a notification and can upload the required documents from their profiles.
The Action button (marked as 4) is used to edit or delete the request.
A box near the title (marked as 5) shows the total number of employees requested and how many have uploaded their documents.
Buttons marked from 6 to 9 show the status of each document:
- Icon 6: Document needs to be uploaded
- Icon 9: Document uploaded, waiting for approval
- Icon 8: Document approved
- Icon 7: Document rejected
Admins and reporting managers can approve, reject, or delete uploaded documents using the corresponding buttons. Clicking on a document will open a preview, as shown in the image below.

From this modal, managers can review the document and
either approve or reject it.
The document can be re-uploaded by clicking the 'Upload File' button, and it can be downloaded using the
'Download' button.
Clicking on icon 6 or the 'Upload File' button will open a form where the user can upload the document, as shown
below.

In this form, employees can upload their documents. If
the document has an expiry date (such as a visa), it can be entered in the 'Expiry Date' field. The 'Notify
Before' field lets employees set how many days in advance they want to be notified before the document expires.
This field only appears if an expiry date is entered.
The expiry date is optional and can be left blank if the document has no expiration.
Each document request page displays 10 employees. Use the pagination controls to view more employees.
Shift Request

The Shift Request page can be accessed by clicking
'Shift Request' (marked as 1) under the 'Employee' tab in the sidebar. This page shows a table of all shift
requests. Employees will see their own requests, while managers can also view requests from their team.
At the top navigation bar (marked as 2), you’ll find options to filter, group by, and perform actions like export,
bulk approve, bulk reject, and bulk delete.
Shifts define the working schedule for an employee. For example, if a night shift employee needs a regular day
shift for a certain period, they can submit a shift request through AttenDeep. There's no need to update work
details manually—approved requests are handled automatically. Once the requested period ends, the system will
revert to the previous shift.
Managers or admins can approve, cancel, or delete requests. Employees can also cancel their own requests if
needed. For any shift change to take effect, the request must be approved first.
You can create a new shift request by clicking the 'Create' button on the same page.

This is the form used to create a shift request.
Whenever a request is made or approved, the system sends a notification. In the form, the employee selects the
desired shift along with the start and end dates. If the shift change is meant to be permanent (with no end date),
the 'Permanent Request' checkbox can be selected.
In the table view, each request is clearly displayed. Clicking on a row will open a detailed view. You can also
sort the table data by clicking on the column headers — an arrow will show the sort direction (ascending or
descending).
Each request includes a 'Comment' option (marked as 6), where both employees and managers can add notes or ask
questions. The three action icons (marked as 5) are for updating, duplicating, or deleting a request. The
'Duplicate' option allows users to quickly create a new request using the same data. Clicking this icon opens a
pre-filled form with the existing request details.
Quick filters (marked as 3) at the top of the table allow users to view only 'Approved' or 'Rejected' requests.
The three-dot menu (marked as 4) lets employees choose which columns should be visible in the table.
The table includes two tabs: 'Shift Requests' and 'Allocated Shift Requests'. Requests made for reallocation from
the employee profile (as discussed earlier) will appear under the 'Allocated Shift Requests' tab.

This section shows shift reallocation requests made by
employees, where one employee requests to switch shifts with another (the allocated employee). The same request
also appears in the allocated employee’s shift request view.
If the allocated employee is available for the shift change, they can respond by clicking the check mark (✔️) to
accept or the cross mark (❌) to decline.
In the admin or manager view, there is an extra column called 'User Availability' that shows the allocated
employee’s response as 'Not Marked', 'Available', or 'Not Available'. Based on this, the admin can approve or
reject the request. If approved, the shifts will be swapped between both employees starting from the request's
start date.
To create a reallocation request, go to: Employee → Profile → Worktype & Shift, and click the 'Create' button.
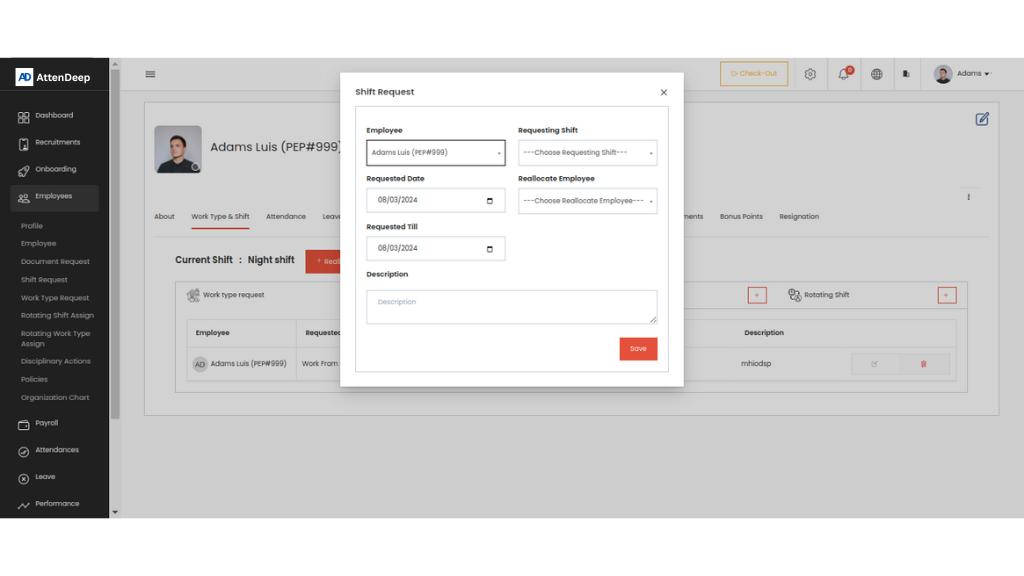
In this form, the employee needs to select the shift
they want to request, choose the allocated employee to swap
with, and enter the start and end dates.
Once approved, the requested shift will be assigned to the allocated employee, and the allocated employee’s shift
will be given to the requesting employee — the shifts will be swapped.
Work Type Request
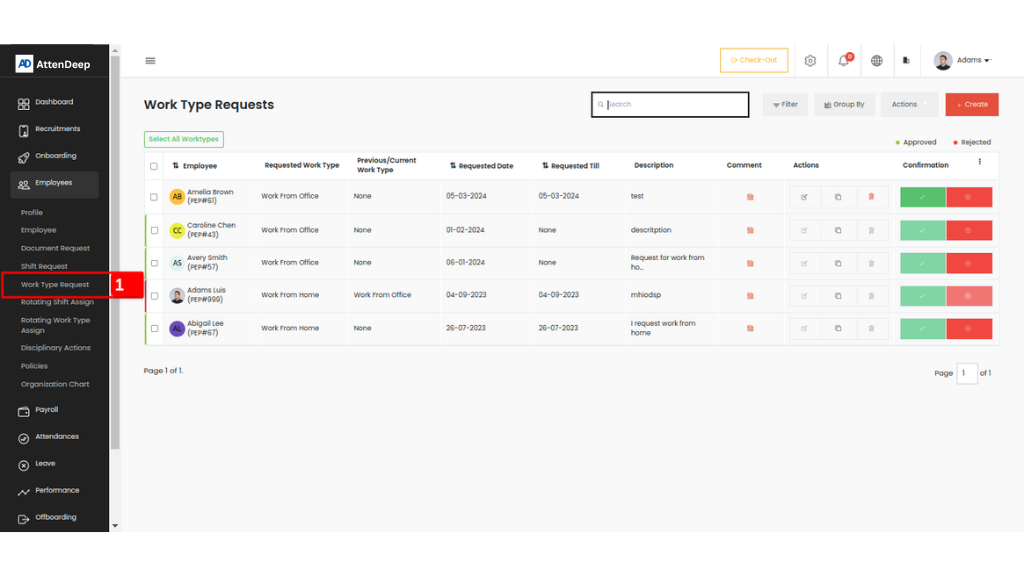
The 'Employee Work Type Request' view can be accessed by
clicking on 'Work Type' (marked as 1) under the 'Employees' section.
Work types define how an employee works, such as from the office, from home, etc. Similar to shift requests,
employees can request a different work type for a specific time period. Once that period ends, the system will
automatically switch back to the previous work type.
However, for the work type change to take effect, a manager or admin must first approve the request.
This view shows all work type requests in a table, similar to the shift request view. The features like the
three-dot menu, quick filters, action buttons, duplicate option, and others work the same way as in other list
views.
Rotating Shift Assign
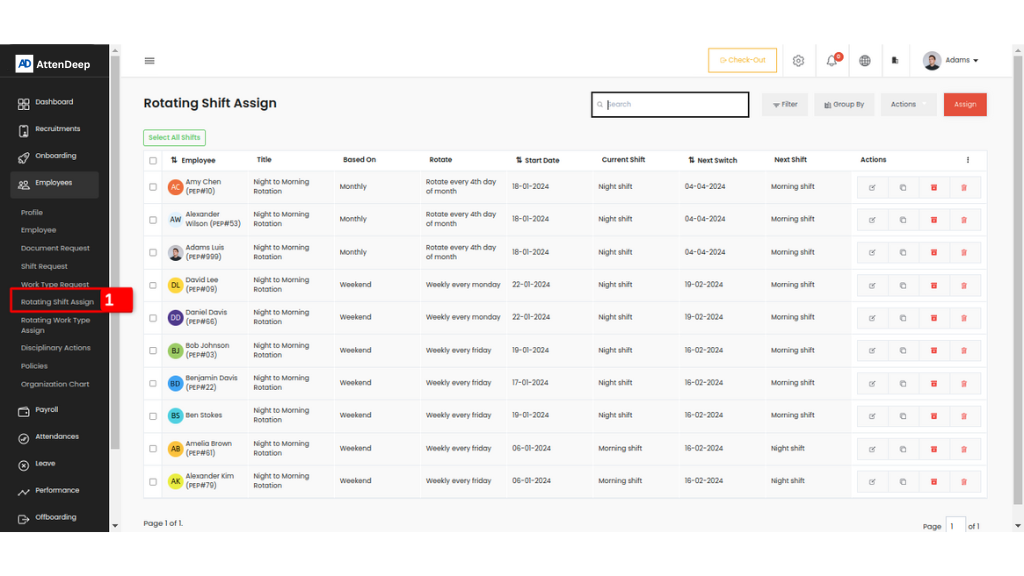
Rotating Shift Assign is used to manage employees who change shifts regularly. You can create a rotating shift assignment based on specific conditions. There are three main types:
- After: Changes the shift at fixed intervals (e.g., every few days).
- Weekend: Changes the shift on a specific weekday you choose.
- Monthly: Changes the shift on a specific date every month.
Rotating Work Type Assign

Rotating Shift Assign is used to manage employees who change shifts regularly. You can create a rotating shift assignment based on specific conditions. There are three main types:
- After: Changes the shift at fixed intervals (e.g., every few days).
- Weekend: Changes the shift on a specific weekday you choose.
- Monthly: Changes the shift on a specific date every month.
Disciplinary Actions
The Disciplinary Action feature is used when an employee
misbehaves or violates company policies. The admin can take actions such as a warning, suspension, or dismissal.
Before using it, the admin must set up the possible disciplinary actions in the Settings page. While creating an
action, the admin can also decide whether the employee’s login should be blocked during the action period. If
enabled, a suspended or dismissed employee will not be able to log in to the system during that time.
To access this feature, click on 'Disciplinary Action' (marked as 1) under the 'Employees' submenu. The actions
are shown in a table with full details.
For suspensions, there are two types: day-based and hour-based. If login blocking is enabled, the employee's
access will automatically be restored after the suspension period ends, whether it's in days or hours.
Policies

Company policies are rules and guidelines set by the
organization to guide employee behavior, actions, and decision-making. They help ensure legal compliance, promote
a safe and respectful workplace, protect company assets, and maintain fairness and consistency across the company.
Admins can create and manage these policies, and all employees can view them for reference by clicking on the
'Policies' menu (marked as 1) under the 'Employees' section.
Organization Chart

The Organization Chart provides a simple visual representation of employees and their reporting hierarchy. You can access the main view by clicking on the 'Organization Chart' (marked as 1 in the image). At the top of the view, there's a dropdown to select a specific manager, allowing you to filter and view only the employees reporting under that selected manager.